Wattle & Daub: Craft, Conservation & Wiltshire Case Study
Contents
Contents
2 History
3 Craft
3.3 Panel Types
3.4 Staves
3.6 Daub
3.7 Decoration
4.1 Soils
4.1.1 Constituents
4.1.2 Plasticity
4.1.3 Strength
4.1.4 Field Testing
4.1.5 Selection
4.2 Dung
4.2.2 Lignin
4.2.3 Urine
4.2.4 Microbial Debris
4.2.5 The Role of Dung
4.3 Fibre
5.2.3 Maintenance
5.3 Repair
5.3.1 Partial Renewal
5.4 Replacement
5.4.1 Brick Infill
5.4.2 Renewal
6.3 Fieldwork
6.5 Evaluation
| Title Page Previous Next | Conservation >Repair |
5.3 Repair
Poor understanding of the values, materials and techniques
for conserving wattle and daub all too often leads to the unnecessary
replacement of partially decayed panels, or even the removal of intact panels to
improve access for frame repairs. In part, this is due to the lack of respect
for the material and these views are still common within the conservation
industry. More frequently, those that specify and carry out the works on daub
have little understanding of the principles of conservation. What they have in
common is the poor realisation that values change over time: the value of wattle
and daub today may (hopefully) be different to its value in the future,
especially as it becomes increasingly scarce. The principles therefore demand
that every effort should be made to preserve wattle and daub. For successful
care of the buildings, this approach must be understood not only by the primary
custodian but also by all those involved in identifying problems, specifying the
need and type of repair and the execution of those repairs. The principles
governing the repair of wattle and daub may therefore be summarised as:
[90]
- Purpose of repair: to eliminate the causes of decay in daub, wattle or lath and to stabilise the present condition of the panel as a whole.
- The need for repair: to prevent further decay threatening the stability of the panel; to insure against its failure damaging other fabric, such as pargetting or wall paintings.
- Avoid damage: bias towards repairing the existing wattle and daub fabric rather than replacement - preferably by minimal disturbance or removal of historic fabric.
- Use proven techniques: endeavour to match the traditional methods used in the original construction of the panel.
A disciplined approach to conserving wattle and daub will help to ensure implementation of good conservation practice.
Recording
Prior to starting any work, it is important to record the existing fabric. Where a building, historically, was of social importance, then good records of the structure might be available. Plans, sketches and details of past repairs (e.g. schedules of work and invoices) may exist that assist with appraisal. Such items might be available from the owner, land registry, local study groups, county records office (tithe maps, court rolls, estate records, etc.) and the National Monuments Record. Appendix 2 includes a template for the recording of wattle and daub.
Opening Up
The degree to which intact daub and wattlework can decay is often an unnecessary cause of alarm: if the panel is still doing its job of closing the gap between the frame then, by definition, it is functioning correctly. In this case, the stripping of the daub is unwarranted and must be avoided since, once started, it is often impossible to replace the daub without first renewing much of the wattlework.
Impact of Timber Frame Repairs on Panels
When considering structural repairs to a timber frame, the choice of repair method should consider the disturbance to the wattle and daub. For example, steel straps, braces and ties fixed to the surface of the frame will avoid disturbing the infill panel and may be more reversible. However, where it is necessary for structural stability to take precedence over conservation of historic fabric, it may be essential to remove frame members that surround wattle and daub or access frame parts hidden by the panel. In these circumstances, removal or temporary support of the intact wattle and daub may be possible, and in any case should always be attempted.
 |
|
As temporary bracing, a scheme of lateral support or shuttering may be devised to fasten the infill in position [Figure 29]. It may be necessary to support the panel on both faces. Where the bottom rail or cill is to be removed, a system of bent aluminium or steel cramps screwed to the upper rail can be assembled [Figure 30].
Where whole sections of the frame are to be dismantled, daub panels may be sandwiched between shuttering prior to disassembly of the frame. After recording the locations of each panel and tagging each one for later identification, the wattle and daub may be removed for safe storage in a dry storeroom. The carpentry of repaired or replacement frame members must precisely reproduce the position of staves and groove(s) in order that refitting of the wattle and daub requires zero insertion force. Any attempt to adjust the position of staves or wattle will damage the daub. Some cracking may be expected by the disturbance, but can usually be repaired using the methods discussed below.
Cracks
The causes of cracking in historic daubs and plaster have already been discussed in Section 5.2. Cracks in the faces of external panels must be repaired as soon as possible using like materials (e.g. a lime plaster) to prevent water penetration. Internal faces may be repaired in the course of routine maintenance.
Delamination of Daub.
Most historic panels have small areas of delamination and should not be cause for concern. Where large areas of the panel have delaminated there is a risk that the daub may fall away. In this situation, the following repair options should be considered:
- If there is no risk of water penetration and further decay, the fault may be left to run its course. Replace missing daub if or when it falls away.
- Small areas of loose daub can be removed and replaced using new or recycled material.
- Tying in of large sections of loose daub.
Grouting
to re-bond large delaminated areas.
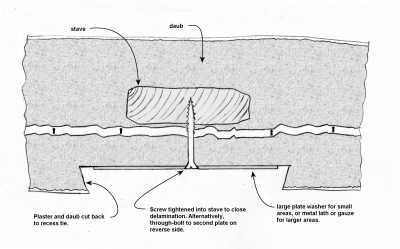
Daub that has delaminated across a limited area of the panel can be re-secured using ties. The methods used to re-attached the daub should be selected based on each particular scenario and should not be prescriptive. The method will also be guided by the type of backing and whether access is available from both sides. A typical repair is shown in Figure 31. The fixing for the loose daub can be either the wattlework, one or more staves, or plaster on the opposite face of the panel. It is important to spread the load of the fixing across as large an area of daub as possible to prevent the daub cracking and the tie ‘pulling through’. Suitable candidates for tie end plates are large washers, rigid metal ‘lath’ or gauze of a non-corrosive material such as brass or stainl[91]s steel.91
If several large areas of a panel have become delaminated where the use of tying is impractical, there have been reports of successful attempts to re-establish the integrity by grouting.[92] Suitable methods are grouting by injection or by hand.
To inject grout, holes should be drilled through one face of the panel into the top of each area of delamination. A suitable grout is made from a hydraulic lime and pulverised fly ash (PFA). This should be mixed to a suitable consistency for application by injection gun. Drill-holes are then made good by plugging with a lime mortar.
Hand grouting has the benefits of not disturbing the faces of a panel, which may be desirable where decorated. However, there is a significant risk that escaping grout may spoil the finish. It also relies on access to the void at the top of the panel. A suitable procedure is shown below.[93]
|
Treatment of Edge Gaps
The intrinsic shrinkage of clay results in a narrow gap at the interface between daub and timber frame. This has always been stated as a weakness of wattle and daub. However, where a panel is correctly finished flush or recessed within the frame, then the probability of rain penetration is minimal. The remaining concern is therefore primarily one of draughts. The gap may therefore be filled with a suitable material. Where panels are not plastered, daub may be used as the filler if small quantities are available to hand. The subsequent shrinkage of the filler may require two or three iterations of the process in order to completely close the gap. Alternatively, the gaps may be closed by first dampening the edges of the daub and timber, then filling with a sacrificial lime mortar (e.g. 1:3 lime:sand mix using a non-hydraulic lime and well-graded fine but sharp aggregate). This may be used for both bare daub or plastered panels.
Seasonal movement of the frame may be caused by thermal expansion, changing moisture content of the timber, settling or cyclical movement of soils, or by live loads such as wind or snow. It is therefore highly likely that such movement will result in the edge gaps returning and so requiring ongoing remedial action. This should be considered an aspect of routine maintenance.
The use of mastics or expanding foams is not recommended. Such materials, being impermeable to water, can result in moisture being trapped inside the edges of a panel or against the timber frame exacerbating decay.
Detailing
The base of an infill panel is particularly vulnerable to the trapping of water. Where a panel is recessed from the frame on all four sides, water may collect on the top surface of the timber. If the water is then conveyed inwards, it may result in fast decay of the timber and the base of the staves.
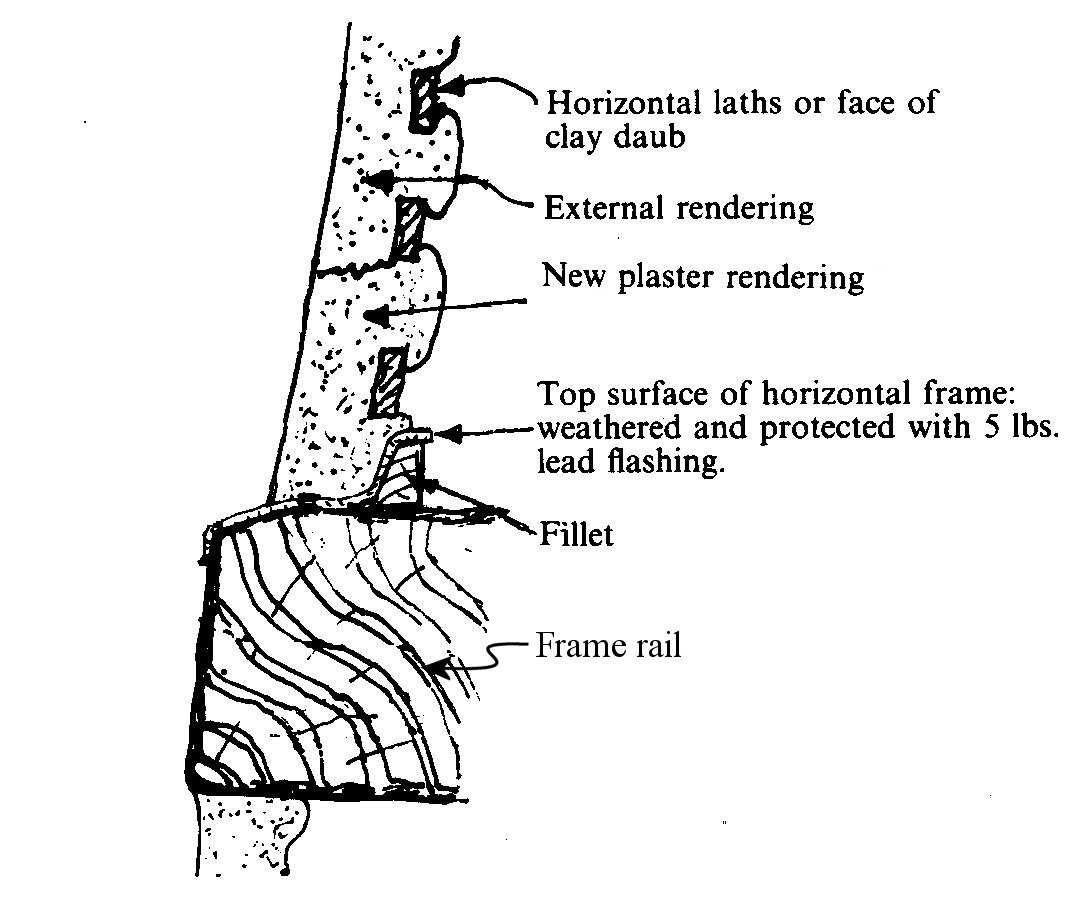
Figure
32. Lead flashing repair may trap water against the
frame causing accelerated rot. Adapted from Reid (1989).
A system of using a timber fillet and lead flashing has been proposed to expel water from the base [Figure 32]. Unfortunately, any moisture finding its way under the lead may cause decay of the underlying timber and may block deep-penetrating water that falls behind the timber fillet (such as via cracks or missing daub). Moisture on the underside of the lead, including that caused by condensation, may cause it to corrode if organic acids are also present from t[94] timber.94
An alternative approach is use a sacrificial fillet of
mortar to dress the edge of the panel so that it forms a run-off to the vertical
face of the timber. During rainfall, the mortar is likely to allow more water
ingress than a lead flashing but will quickly re-absorb moisture via capillary
action and then expel it into the atmosphere during drying. These wetting-drying
cycles are likely to cause early failure of the mortar fillet, but if accepted
as being sacrificial, it is easily replaced from time to time and secures the
longevity of the historic wattle and daub and frame.
[90]
A full discussion and categorisation of the principles is found in Brereton
(1995).
[91]
The cutting to size of galvanized sheet exposes unprotected areas of steel that
are prone to corrosion. This may eventually weaken the gauze or cause further
delamination due to ‘corrosion jacking’. Where the cut gauze is near
the surface of the panel, rust stains may spoil the finish.
[92]
Harrison (1999), p.80.
[93]
Adapted from Beckmann (1995), Ashurst and Ashurst (1988b), Ashurst and Ashurst
(1988c) and Feilden (1982).
[94]
Bordass (1998).